blog, Collaborations, LIFESTYLE

5 Tips to Create the Perfect Cheese Board (*In Collaboration with SPAR NI)

Hi there!

Can you believe how close we are to Christmas already?…Where has this year went to? I am slowly starting to think about the big Pre-Christmas decoration house clean and getting the social diary organised. Our social life normally revolves around food (!!!) and we rarely have a gathering in Rose Cottage without a cheese board making an appearance…any excuse eh?!

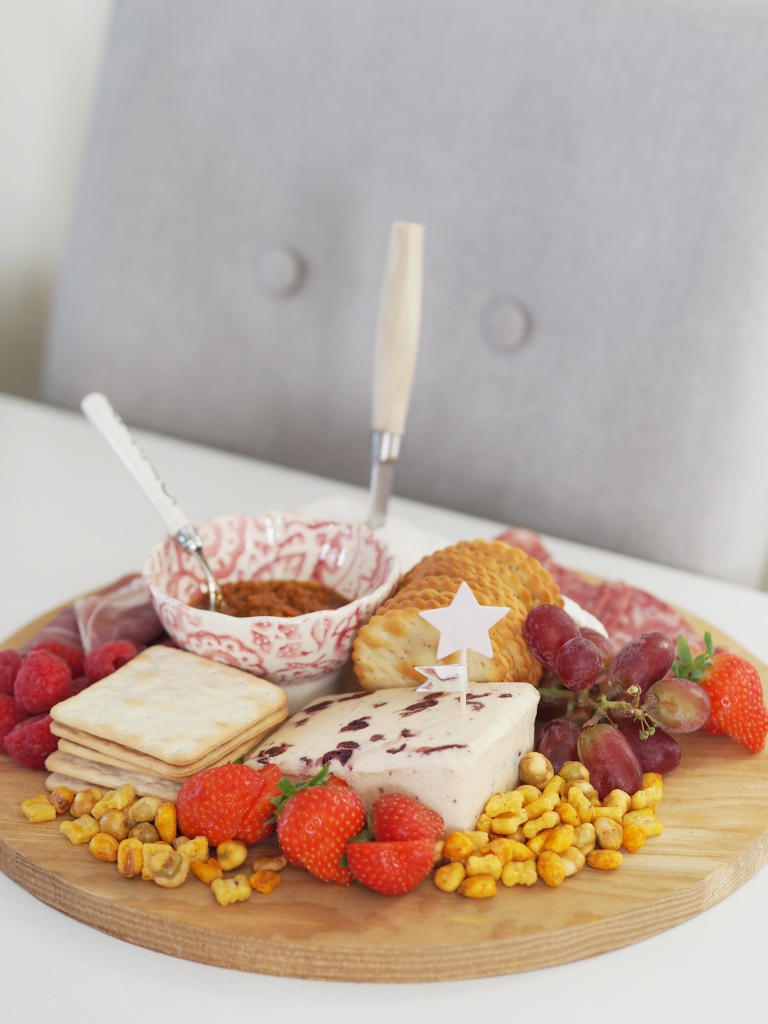
Cheese boards are a quick and easy way to impress your guests and there is something on there to suit everyone’s tastes; So here are my top 5 tips to make a simple cheese board for this festive season:

Tip 1 : Buy a wide selection of high quality food.

Your local SPAR store is packed with goodies to make entertaining this Season as simple as possible. Head there and pick up a variety of produce including cheeses, crackers, fruit and dips – keep in mind colours, as you want to make your board as interesting on the eye as possible.

Tip 2: Pick the perfect board.

Board shape will dictate the way you style your food. If you have a bigger gathering, be creative with what you use to display your food on; I have used a wood effect floor tile sample before which is a cheap and effective alternative.

Tip 3: Start by positioning your food on the board with the biggest items first.

I place my cheese and bowls before anything else, these take up the most room – you will tuck everything else into the blank spaces later on! I like using bowls to hold things like dips, pesto and smaller items; plus the height and round shapes helps break up the cheese board and makes it more fun to look at. I always choose to serve cheeses in a variety of shapes to add visual interest. SPAR have a fantastic range of cheeses in store, our favourite being the Wensleydale and Cranberry which is perfect for this time of year especially.

*Remember cheese is best served at room temperature which means you should take it out of the fridge and let it rest for 30 minutes to an hour before serving.

Tip 4: Place your crackers/ breads and meat around these.

Make little piles of crackers and put bread on its side to add height to your cheese board. Don’t forget to have some cutlery, especially knives close by to allow your guests to easily add extras on top.

Tip 5: Use fruit, nuts and sweets as fillers.

This is where the magic happens!! Filling the gaps in your cheese board is what really gives the professional and finished feel. Also these are the little extras which keep people coming back to the cheese board for more!

And lastly enjoy! As I said before, it’s any excuse here in Rose Cottage to crack out a cheese board and with SPAR stocking such fab produce, it couldn’t be any easier.

Be sure to tag me and SPAR over on Instagram if you make one using the tips so we can droll over it too!

Hope you enjoyed reading, as much as I enjoyed writing!

blog, Collaborations

What a Year it’s been! (*In Collaboration with Progressive Building Society)

Hello there!

Well what a year it has been at Rose Cottage with the lockdowns having brought many ups and downs for us. The big increase in family time together has been so lovely and we’ve really soaked up every bit of wee Harry; the memories made with him will never be forgotten. As Ash works in non-essential retail he has been off for over 6 months of the last year!! (I remember him taking 3 weeks off for our wedding and he thought that was far too long!) Ash absolutely loves his work and is counting down the seconds until Friday when he returns!

However, what the last year has also brought us is uncertainty in employment, sleepless nights and then redundancy. I managed a day centre for Adults with Learning Disabilities which closed due to Covid and didn’t reopen. I won’t lie, it was a rough time, but one thing which helped us through the uncertainty was our ‘rainy day fund’ which we started together when we got married. In 2013 we never would have imagined what would be ahead of us in 2020/21 but knew having a little put away in a nest egg could see us right if needed. I remember going to our local Progressive Building Society and the staff being so helpful and encouraging when we chatted through the range of saving accounts available to us.

Thankfully, my period out of employment didn’t last too long and I was able to add to our Savings with a redundancy payment, which has allowed us to start on the exterior of Rose Cottage. The plans are big (!!!), and we are starting with fencing our entire outside space, levelling the garden and putting in some hedging as the initial stage. More savings will be needed to complete the entire process and we plan to continue to save long term for the future and the rainy days.

Saving for the outside hasn’t taken us quite as long as for the inside. I suppose not being out and about as much has helped. I’ve really cut down on impulse purchases and resisted the temptation to spend money on things I don’t really need. As parents, Ash and I really want to instil these same values in little Harry, just as out parents did with us. The money we are putting away for wee Harry now could make such a difference to him in his adult life.

If this last year has taught us anything, it’s to prepare for the unknown; I would really encourage you to consider saving a little bit each month from your monthly income. Have a chat with the staff at your local Progressive Building Society or go online to find out about all the Saving Account options; they will keep you right with which one would be best for you.

Hope you enjoyed reading, as much as I enjoyed writing!

Essential Oils

Getting Started with Essential Oils

Hello there!

In Rose Cottage, we have seen SO MUCH success using essential oils as support for sleep, stress, healthy immune systems, hormones, seasonal stuffiness and respiratory support, household cleaning, cooking and a load of other things!

I love knowing there is nothing more natural and there are no side-effects or long-term dangers like the many other toxic options that are sold in the shops.  I share these essential oils for a living because they have truly helped my family!

Essential oils are powerful and created to work perfectly with our bodies.  It’s funny how the media talk about essential oils like it’s a new trend – in reality people have been using them for thousands of years!  Young Living is a trusted source and a pioneer in bringing the use of therapeutic oils to Europe…So I’ve made the permanent switch!

How I got started using Essential Oils

When I first started using Young Living, I got this amazing deal and I think it’s the perfect way to get everything you need to get started with essential oils.  I love the oils so much I want to share them with YOU  – along with the resources to help you learn how to use oils in your home and promote wellness.

In fact, this is everything you need to get started!

The Premium Starter Bundle

Not only is the Premium Starter Bundle the perfect option for those who are serious about transforming their lives, but it’s GREAT value. 

Your Premium Starter Bundle will include:

Choice of Diffuser (Aria, Charcoal Lantern, Desert Mist or Dewdrop)

Lavender 5ml

Lemon 5ml

Peppermint 5ml

Orange 5ml

Frankincense 5ml

Thieves 5ml

Purification 5ml

Stress Away 5ml

Panaway 5ml

Digize 5ml

AromaGlide Roller Fitment

2 Ningxia Red Samples

10 Sample Bottles

Product Guide

Join a Community

When you order a Premium Starter Bundle, I will send you all the resources you need to learn about your oils:

My welcome package includes a Starter Guide full of information and ideas on how to safely make the best use of your starter bundle, a selection of samples and DIY supplies to get you going. You will also get access to our VIP Instagram page, pod chat groups and an email covering all the essential oil basics.

If you are ready to buy a starter bundle – then send me a message and I would be so glad to send you over my link to get going!

Hope you enjoyed reading, as much as I enjoyed writing!

blog, Collaborations, INTERIORS

The Power of the Humble Rug (*In Collaboration with Kukoon Rugs)

Hi there!

Second blog post of 2021 and it’s still only January! (Touching my forehead to make sure I’m feeling ok!!!) One of my goals is to be more present over here this year…we are off to a great start!

So, lets talk rugs…

I have seen in Rose Cottage just how effective popping a rug down can be at transforming the look and feel of a space – it is safe to say I am a total rug convert! For many, rugs can seem like a bit of an afterthought; but for me, I feel it can be the making or breaking of a room. It anchors and grounds furniture and room layouts, provides colour, texture and warmth as well as adding layers to soften and draw the eye.

Here are some tips on how to choose the perfect one for your home –

1. Go big or go home!

My number one tip is to go as big as possible when choosing a rug. This will give your space a luxury feel and instantly make the room appear bigger. Putting too small a rug down will cause it to get lost in the space and create a ‘floating’ rug look, where it is in the middle of the room with no furniture near it.

2. Pick the perfect spot

Rug placement is absolutely vital to the overall look of your rug in a room. As a rule of thumb, your rug should ground your furniture – place the front legs or feet onto the rug and the back legs off.

See an example of this below and how much better the layout looks with the larger rug and furniture’s front feet placed on top of it – rather than ‘floating’ in the middle.

3. Create a focal point

Use the rug as a focal point – whether that’s choosing something bold or slightly more neutral. A rug will help draw the eye, even if its not to the rug itself but to the overall area. A rug is also a great way to introduce a different or a pop of colour to your room – so don’t be afraid to experiment!

4. Design from the rug up

When you find a rug that you really love – design your room around it. If you pick a statement rug, you can chose to go with more neutral furniture and décor – letting the rug speak for itself; or you can use some of the tones and patterns from it throughout the room.

5. Match your lifestyle

Don’t invest in an expensive rug if your lifestyle doesn’t depict it… kids and animals mean that light coloured, hard to clean rugs are a big no no.

My recent (very early) Spring Living Room update came together after falling in love with this huge 240x330cm rug from Kukoon Rugs, which I have linked here – https://www.kukoonrugs.com/pink-grey-bordered-framed-living-room-rug-milan

They have also generously given Home at Rose Cottage followers 10% off using the discount code rosecottage10

If your room is lacking something, why not try adding a rug?

Hope you enjoyed reading, as much as I enjoyed writing!

blog, INTERIORS

Upcycling a much loved piece of furniture

Hello there!

And a very Happy New Year! 2020 was definitely not the year of the blog over here (!!!!) but I am really hoping this will change in 2021.

I am kicking off the new year with an upcycling project which has been on my to do list for months! This little chair was given to us a while back by my Mother-in- Law; it originally belonged to Ash’s Granny. I absolutely love having furniture in our home which previously belonged to someone else; it normally comes with a story which makes it so much more special. This chair just needed a lick of paint and some new cushions to make it feel right at home in Rose Cottage.

This is the chair before I got my hands on it…

As you can see it needed some love and wasn’t in keeping with our home décor style.

I started by giving it a good wipe down with some Thieves Household Cleaner and an old cloth.

Once it was clean, I painted it with Ronseal 2 in 1 Primer and Paint in Pure Brilliant White. What I love most about this paint is that you don’t need to do any preparation… Hence why the majority of the furniture in my house is painted using this! It goes on so well and takes no time at all. I gave the chair frame 2 thin coats of paint.

I chose to cover the cushions with Emma Bridgewater fabric (surprise surprise!!!), which makes them tie in to the rest of the décor perfectly!

Now there’s a beautiful spot to read a book if ever I seen one…

Are there any upcycling projects you are hoping to get ticked off the (never ending!!) list this year?

Hope you enjoyed reading as much as I enjoyed writing!

blog, Collaborations, LIFESTYLE

Autumnal Shoot (In Collaboration with Christine McIlroy Photography)

Hello there!

What a crazy old time we’re all having eh?! I popped a few videos up on my Instagram the other day which we had created during the first lockdown; it made me think about how as a little family we have created some of the best memories during such a wild time.

When the gorgeous Christine from Christine McIlroy Photography got in touch to see if we would like some family photos taken, I jumped at the chance! I want to remember this time when a lot of other things were taken away from us…we clung to each other. We didn’t need anything else, just each other’s company.

I will absolutely treasure these photos and look back on them with such fond memories of 2020. Thank you so much Christine for capturing our little family perfectly!

I honestly could not recommend Christine more! Not only was she fab with little Harry but she really put us all at ease and captured our family dynamic and personalities perfectly!

You can find her here –

On Instagram – Click here

Facebook – Click here

Hope you enjoyed reading, as much as I enjoyed writing!

blog, Collaborations, INTERIORS

Autumn Update in Collaboration with Bronte by Moon

Hi there!

I am back!!…From my longest (and most unintentional) blogging break ever! I feel like I’ve really neglected things over here and am now on a mission to correct it; starting with telling you all about my latest collaboration! I received the most beautiful pure new wool throw and two cushions from Bronte by Moon, which feel right at home here in Rose Cottage. I have been adding autumnal décor around the house since the end of September and these pieces have complimented the living area perfectly.

Bronte throws and cushions are lovingly made using the finest materials available, ensuring a luxurious soft handle. Their mill has been producing quality wool fabrics since 1837 and I feel honoured to have pieces from their Bronte By Moon collection in Rose Cottage. The Moon Mill is based in Guiseley, Yorkshire and they are now one of Great Britain’s last remaining vertical woollen mills. The soft colours in this throw and cushion set would fit perfectly into your home at any time of the year and carry you throughout the seasons.

How stunning is the fringing and button details on the cushions?

You can check out the full collection via their website https://www.brontebymoon.co.uk/ using the discount code AUTUMNJM for an amazing 20% off!

Hope you enjoyed reading, as much as I enjoyed writing!

INTERIORS

Creating a Gallery Wall

Hello there!

How are you all keeping? I hope lockdown is treating you well, or as well as can be!  I’m still working away, trying to get the jobs ticked off the never ending list and have now moved onto the hall.

Almost a year ago we had a family photo shoot in a local forest park to where we live. You can see the photos here Autumn photo Shoot (in Collaboration with Cathy Dwyer Our Wildest Days Photography)  I have been meaning to get some of the photos printed out and displayed in Rose Cottage, but I don’t know about you…I never get round to printing out photos!! If you have looked at all the beautiful photos which Cathy took, you will understand how difficult it was to only pick a couple.  I decided the best way to get as many up as possible was to create a gallery wall.

So here’s how I pulled it together…

Firstly, your gonna need:

Photos – I ordered mine from Free Prints (this is an app for your phone)  The size I chose were 12×8.

Photo frames (preferably with mounts) I ordered mine from https://www.framesbypost.com/  I went for size 16×12, black frame with white mount.

Wall nails and hooks

Large piece of paper

Measuring tape

Pen

I started by getting a large piece of paper the size of the wall space I was wanting to fill.  I then measured and marked the middle of the paper.  I used this mark to measure out the placement of all the frames.

I started with the middle 2 frames and placed those first.  Once I measured and had them in position I drew round the frames.  I then did the same for the outer frames.

Once I drew round all the frames on the paper, I stuck the page onto the wall using bluetac.

I then measured how far the hook was from the top of the frame and marked this onto the paper and put a nail and hook there.

The large piece of paper was then removed from the wall and I hung the frames.

When creating a gallery wall, if you would like to create a simple and uniform look like mine, choose the same size, shape and colour of frames.  Also use photos which have a similar theme or colour.

It’s as simple as that! As always any questions please get in touch!

Hope you enjoyed reading, as much as I enjoyed writing!

Jill

INTERIORS, LIFESTYLE

Kitchen Lock Down List

Hello there!

Hope you are getting on well with lock down life?! It’s been a bit of rollercoaster over here but I’ve been trying my best to plough on with the never ending list of jobs!  What has really been helping me keep motivated is making lists.  If you follow me over on Instagram you will have seen that I have been going round Rose Cottage making a list of jobs for each room.  This has helped make the whole thing seem more achievable for me and giving me a real focus.  I started with the kitchen; my favourite room in the house and the one I spend the most time in (especially since lock down and having to make approximately 1,652 meals a day!!!).  The list for the kitchen alone was 2 pages long and included things like repainting furniture, defrosting the freezer and deep cleaning the cupboards. The (universal) kitchen lock down list went down a storm when I shared it over on Instagram, so thought I would share it over here too along with a few hints and tips.  So here goes…

  1.  Make a list (or use mine below) of the jobs you want to complete


2. Think about your storage solutions

Having the right storage in place in your kitchen can really help you to organise and make the most of the space you have.  Baskets are your best friend, I most use the Curver range (available in Tesco) and use them for food, cleaning products and lunchboxes.


I also love the Ikea plastic storage solutions, especially for dog food, treats and cereal.


I like to reuse plastic food containers where I can.  The little trays which fruit comes in are great as separators for organising your drawers.  Keeps everything nice and tidy and also reduces waste – what’s not to love?!


3. Deep Clean

Here’s what I use and how I clean the following:

Washing Machine

Take out the powder drawer and soak in the sink for 10 minutes in hot water and fairy liquid.  Give the compartment a good clean with white vinegar and bicarb of soda.  I use this little tool – a Sonic Scrubber to get right in there.  Put the drawer back in and place a cupful of white vinegar into it.  Give the drum, door and seal a good wipe down with a damp cloth.  Put a cupful of bicarb into the drum and run on the hottest wash your machine does.

Dish Washer

Top up your dishwasher salt and rinseaid first, then put a small bowl of white vinegar in the top shelf.  Run on the hottest wash.

Sink

Sprinkle bicarb of soda around your plug, add a capful of white vinegar.  Leave for 10 minutes, then wash away with hot water.  Then add a few drops of essential oil for a beautiful smell!

Oven

I am trying to reduce the amount of heavy duty harmful cleaning products I use in my home, but still to find anything as good as Mr Muscle for cleaning the oven.  I always take the racks and spray them outside, leaving them to soak for 30 minutes.

Cooker Hood

Take out the filters and soak in a sink full of boiling water, white vinegar and fairy liquid for 10 minutes. Leave to dry fully before refitting.

Microwave

Place a bowl of warm water and a few drops of lemon essential oil into the microwave for 2 minutes. Wipe down all surfaces.

Descale Kettle

Put into kettle 100ml white vinegar, 400ml water, 3 drops of lemon essential oil and boil.  Leave to sit for an hour, rinse, wipe and reboil.

Tiles and Grout

Using the Sonic Scrubber and some Cif I clean all the grout and then wipe down all the tiles with warm water.

4. Spend time planning your kitchen work tops

I wrote a blog on kitchen styling which has some fab practical tips on making your kitchen work for you!

Read it here: Styling your kitchen worktops

5. Don’t rush it!

You will never do all of this list in a day, make a plan to do it over the period of a week;  This makes it more realistic to achieve.  Plan to tick off a few jobs per day.

Let me know how you get on with your lockdown lists and any tips you have on keeping motivated!

Hope you enjoyed reading, as much as I enjoyed writing!

INTERIORS

DIY Panelling

Hello there!

Now that we have lots of time in the house, what better way to fill your time than getting on with some DIY?! (Hubby’s round the country now regretting all those jobs they said they would do when they have some spare time!!!)  We are finally getting round to the bedroom makeover which is slowly coming together; I’ve had to scale down the plans a little due to not being out and about – which Ash is delighted with!

As with any room makeover in Rose Cottage I spend hours on Pinterest, pinning all the inspo and images I love.  Then I look for themes and ideas which reoccur and stick with those.  Panelling was something which kept coming up again and again.  I have already tackled some DIY panelling previously in the bathroom (you can see that here ) so was confident in giving it a go again myself.

Here’s a simple step by step guide on how I created one wall of panelling in our bedroom:

First, I measured the whole wall horizontally.  It was 338cm.

img_0786
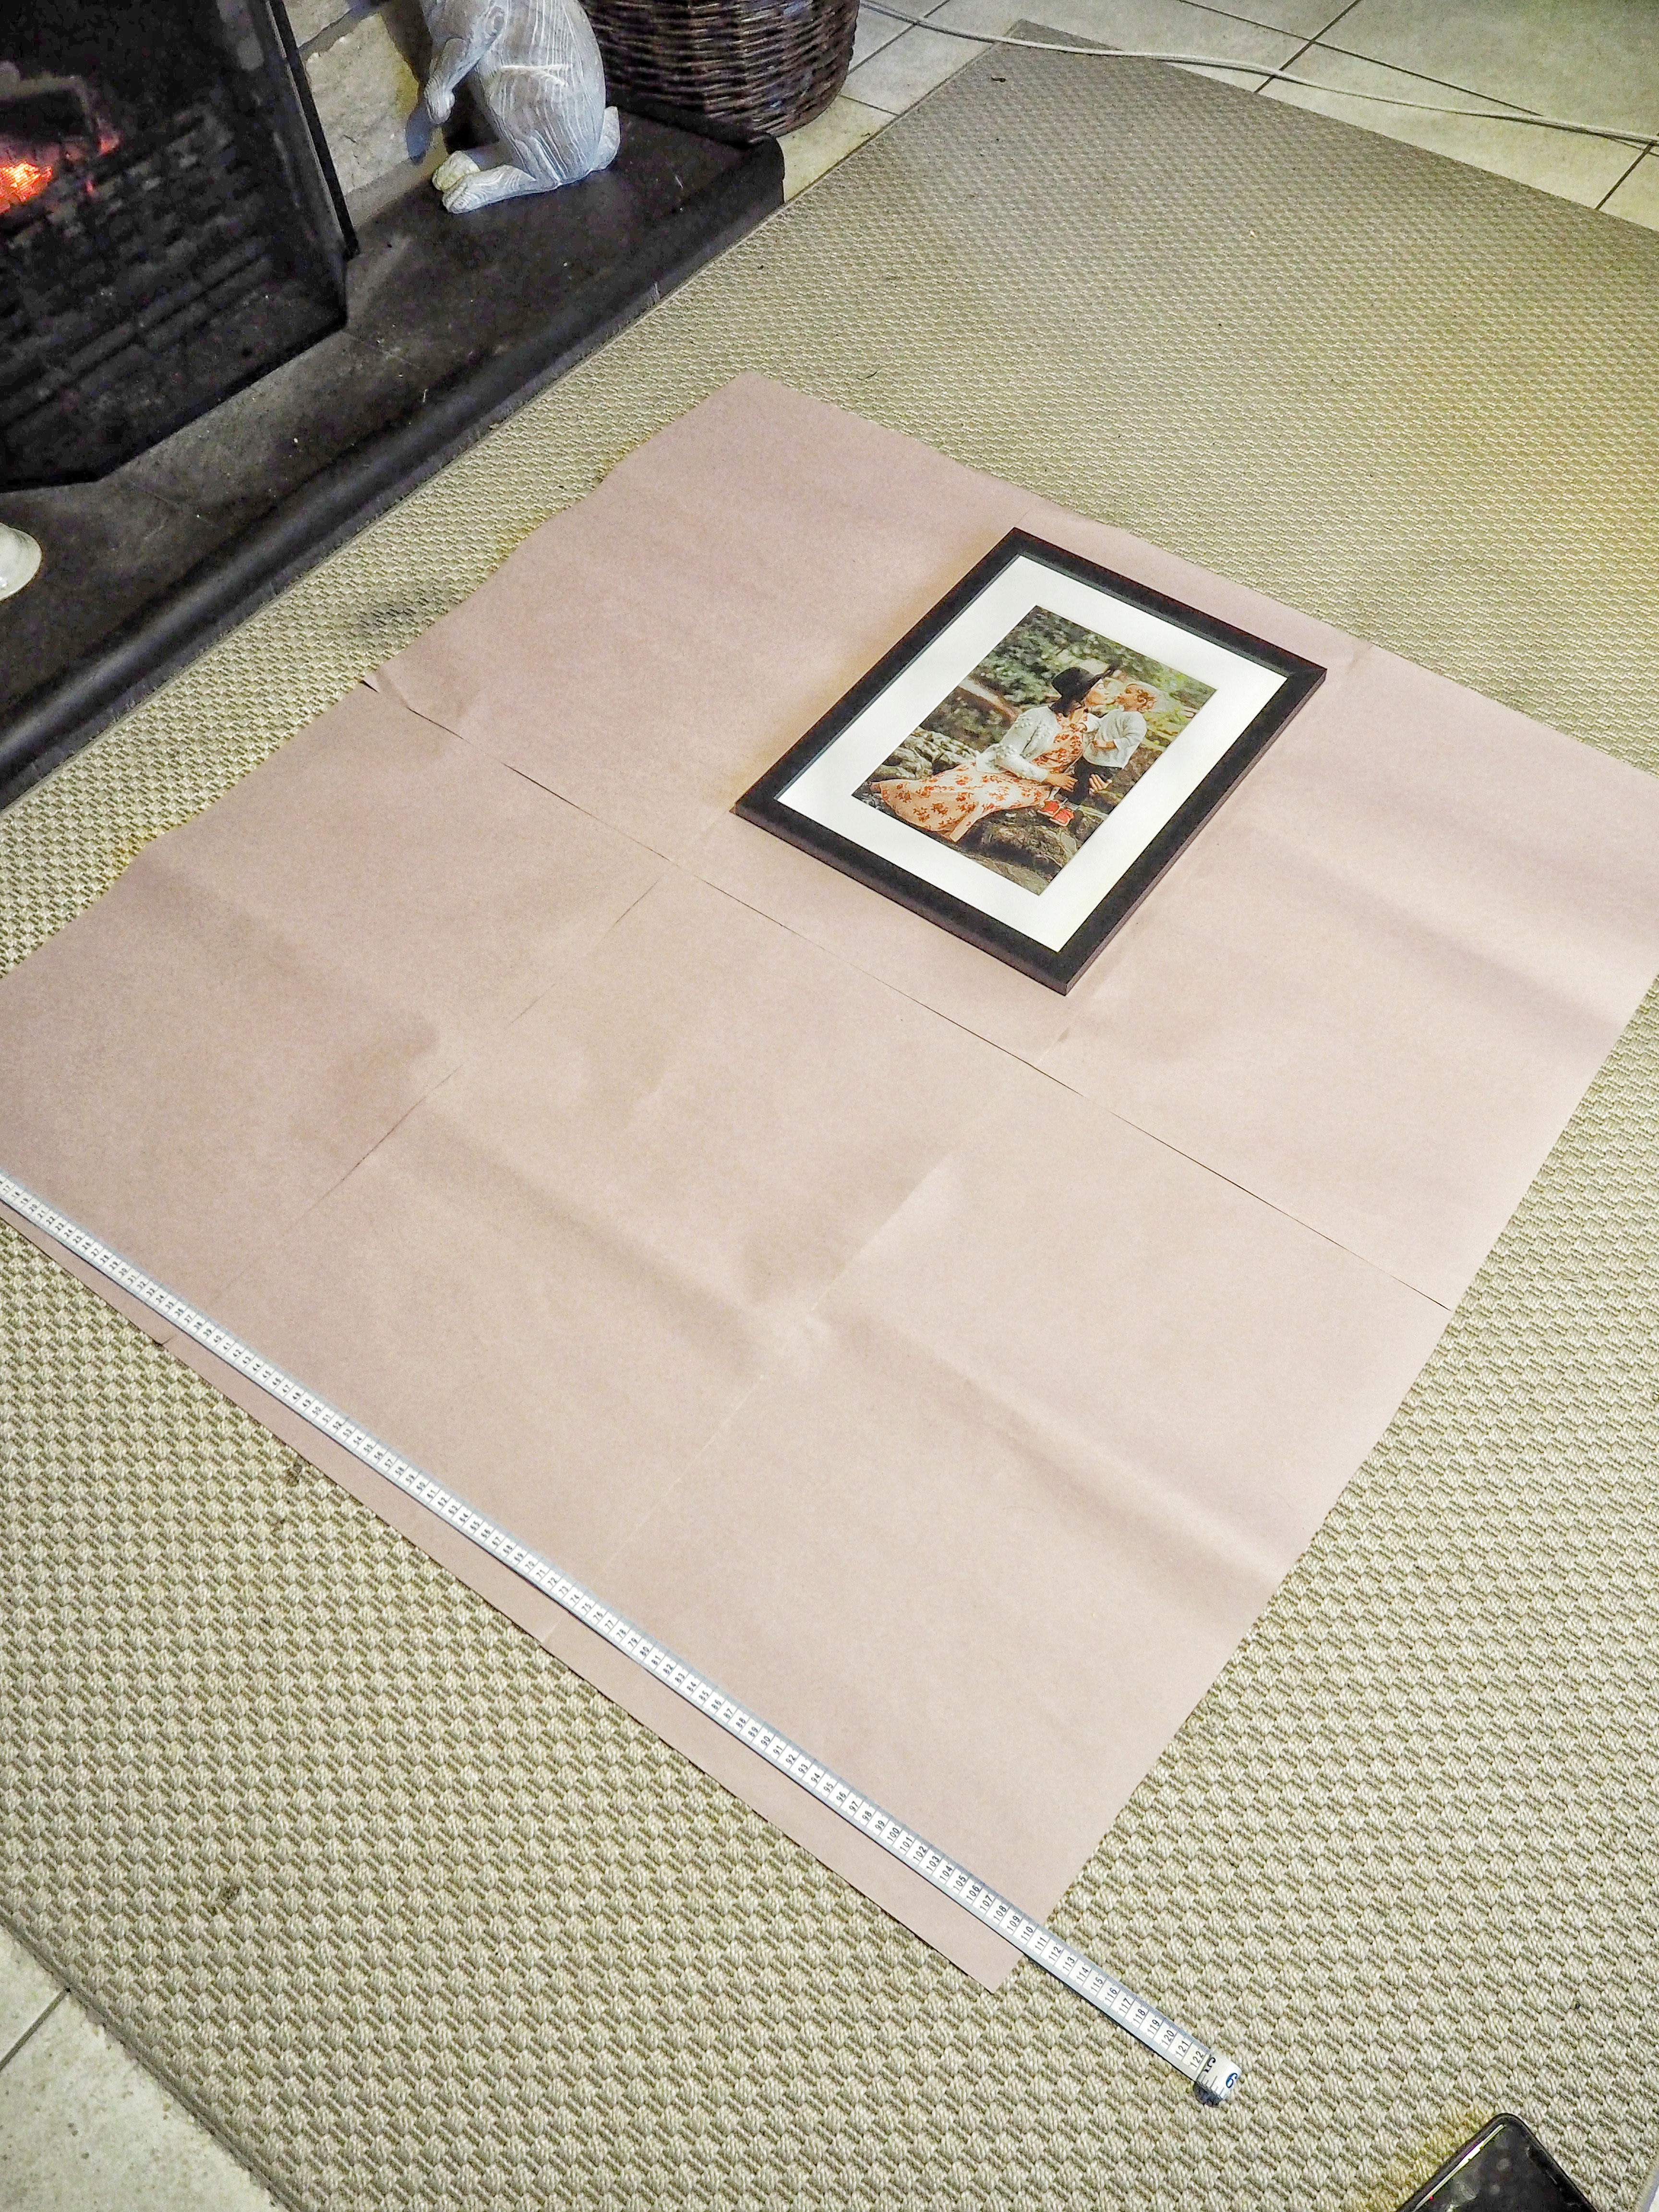
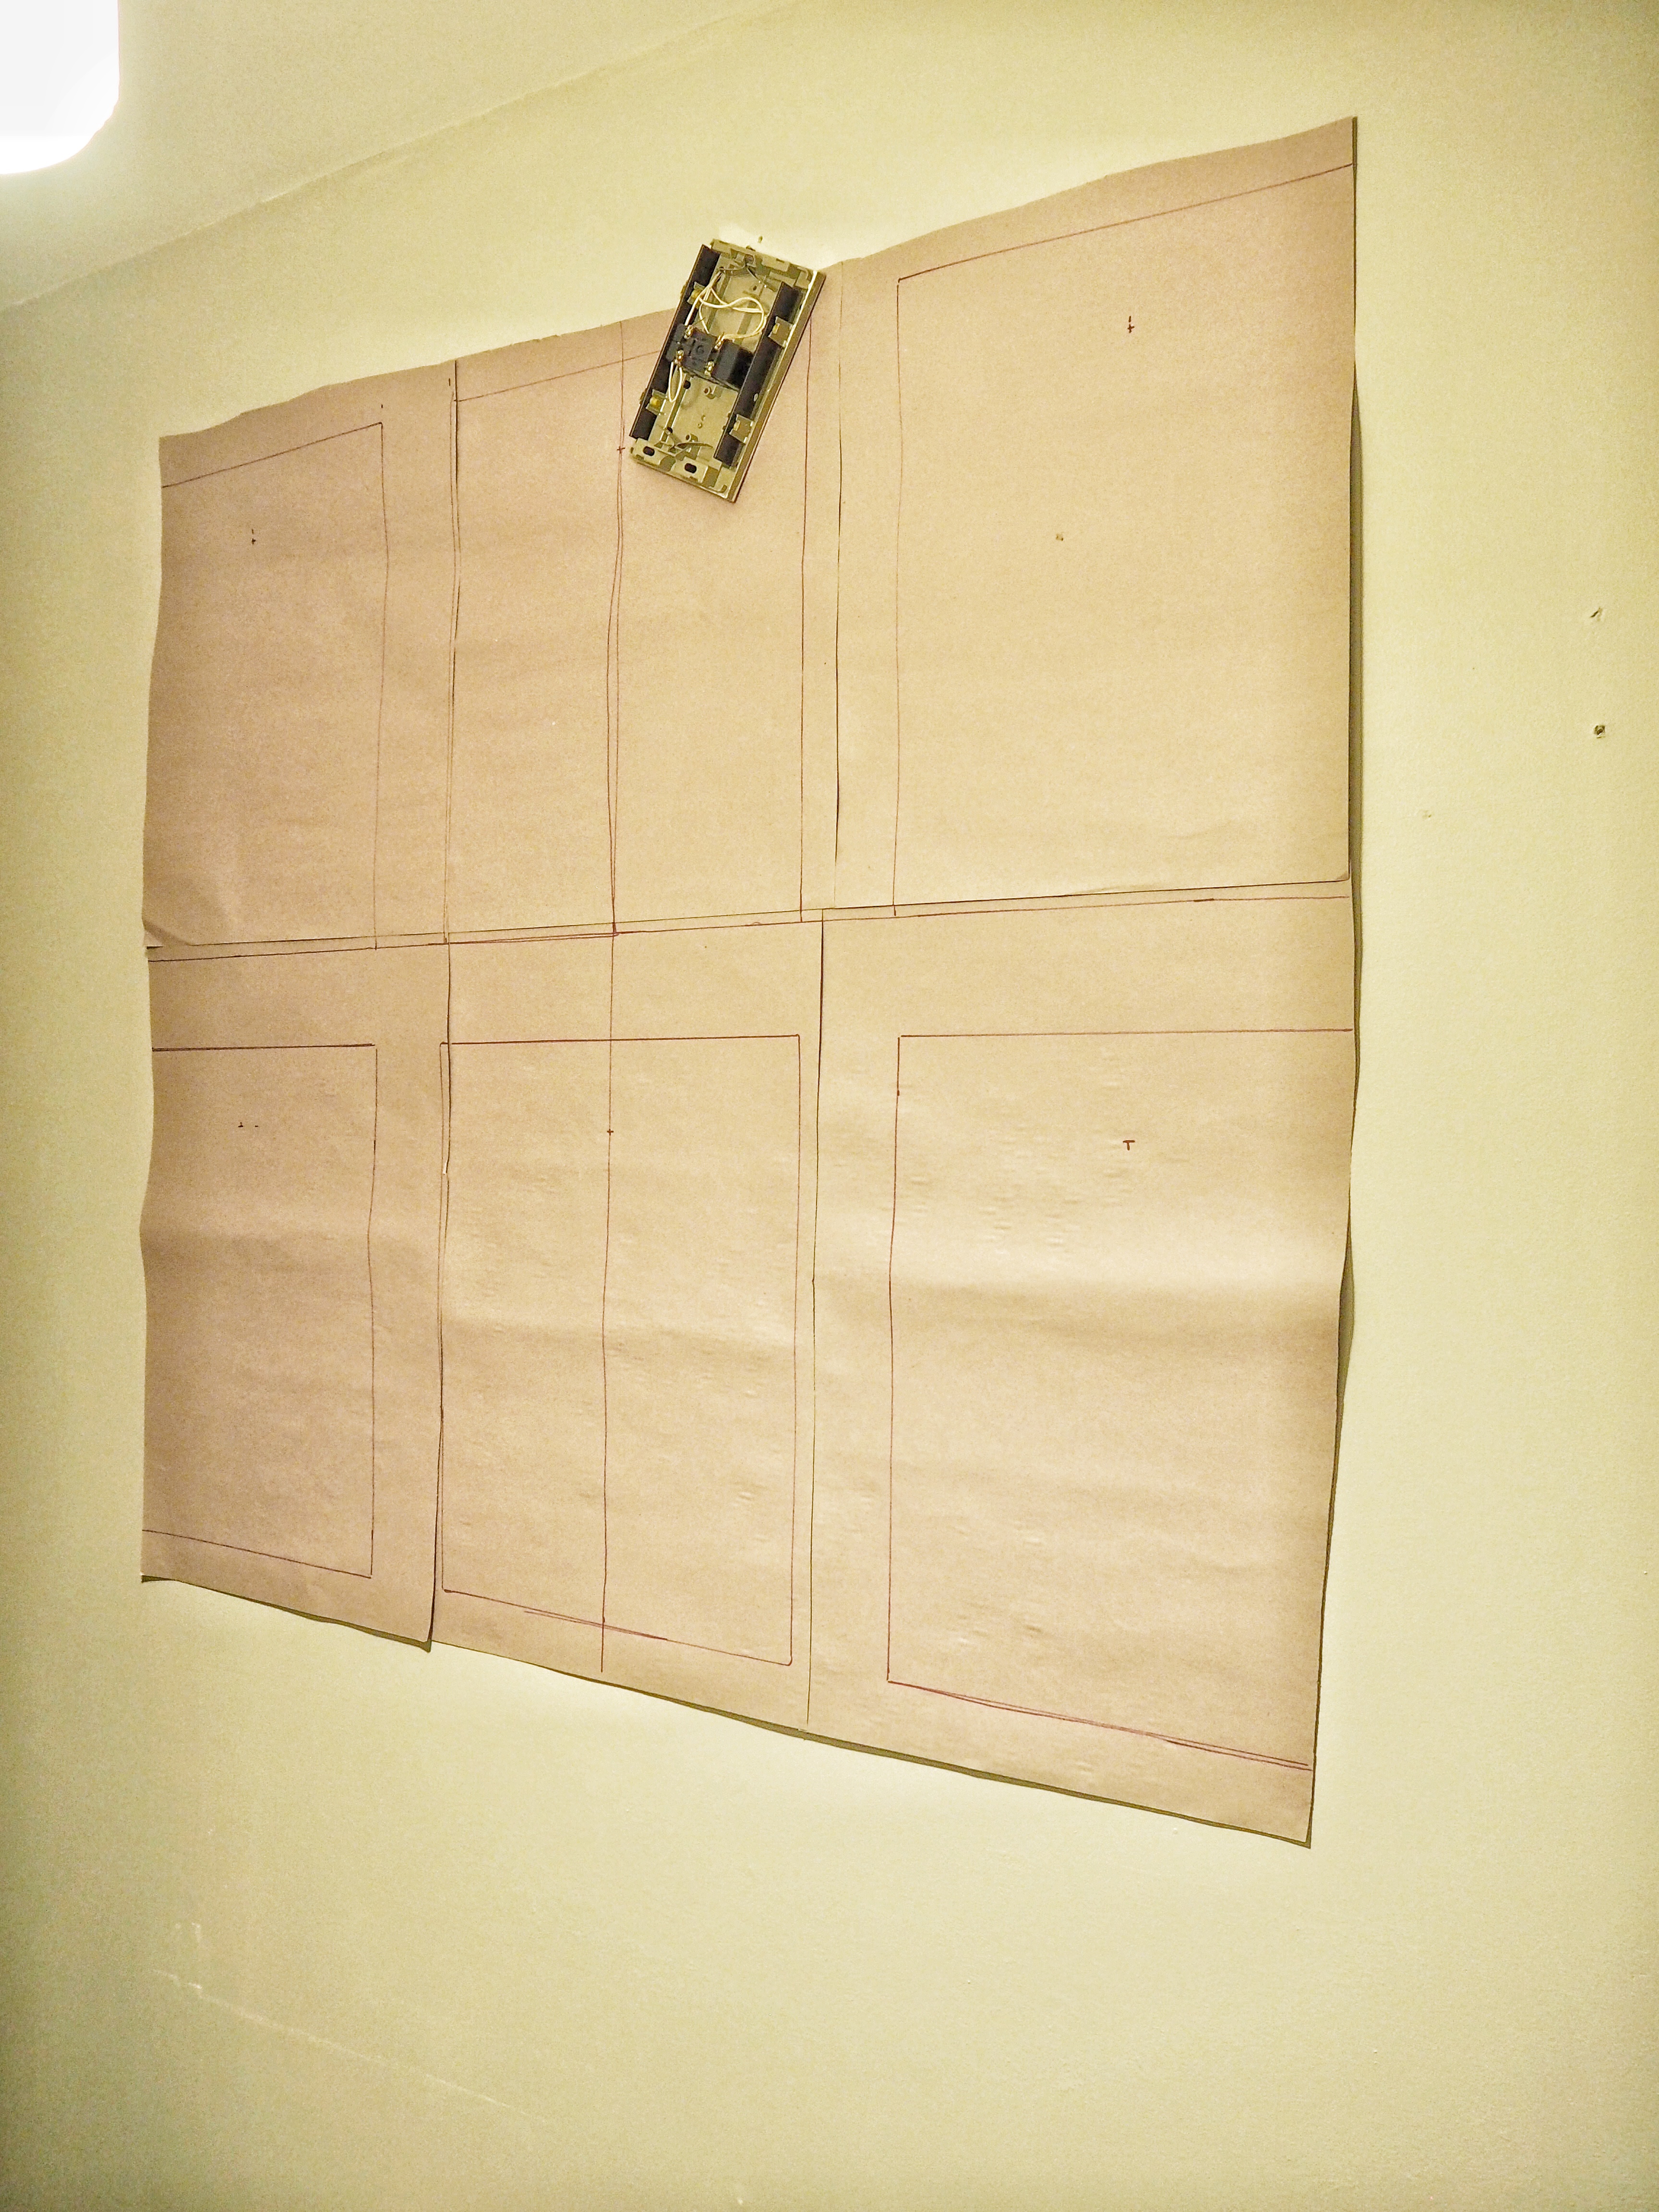
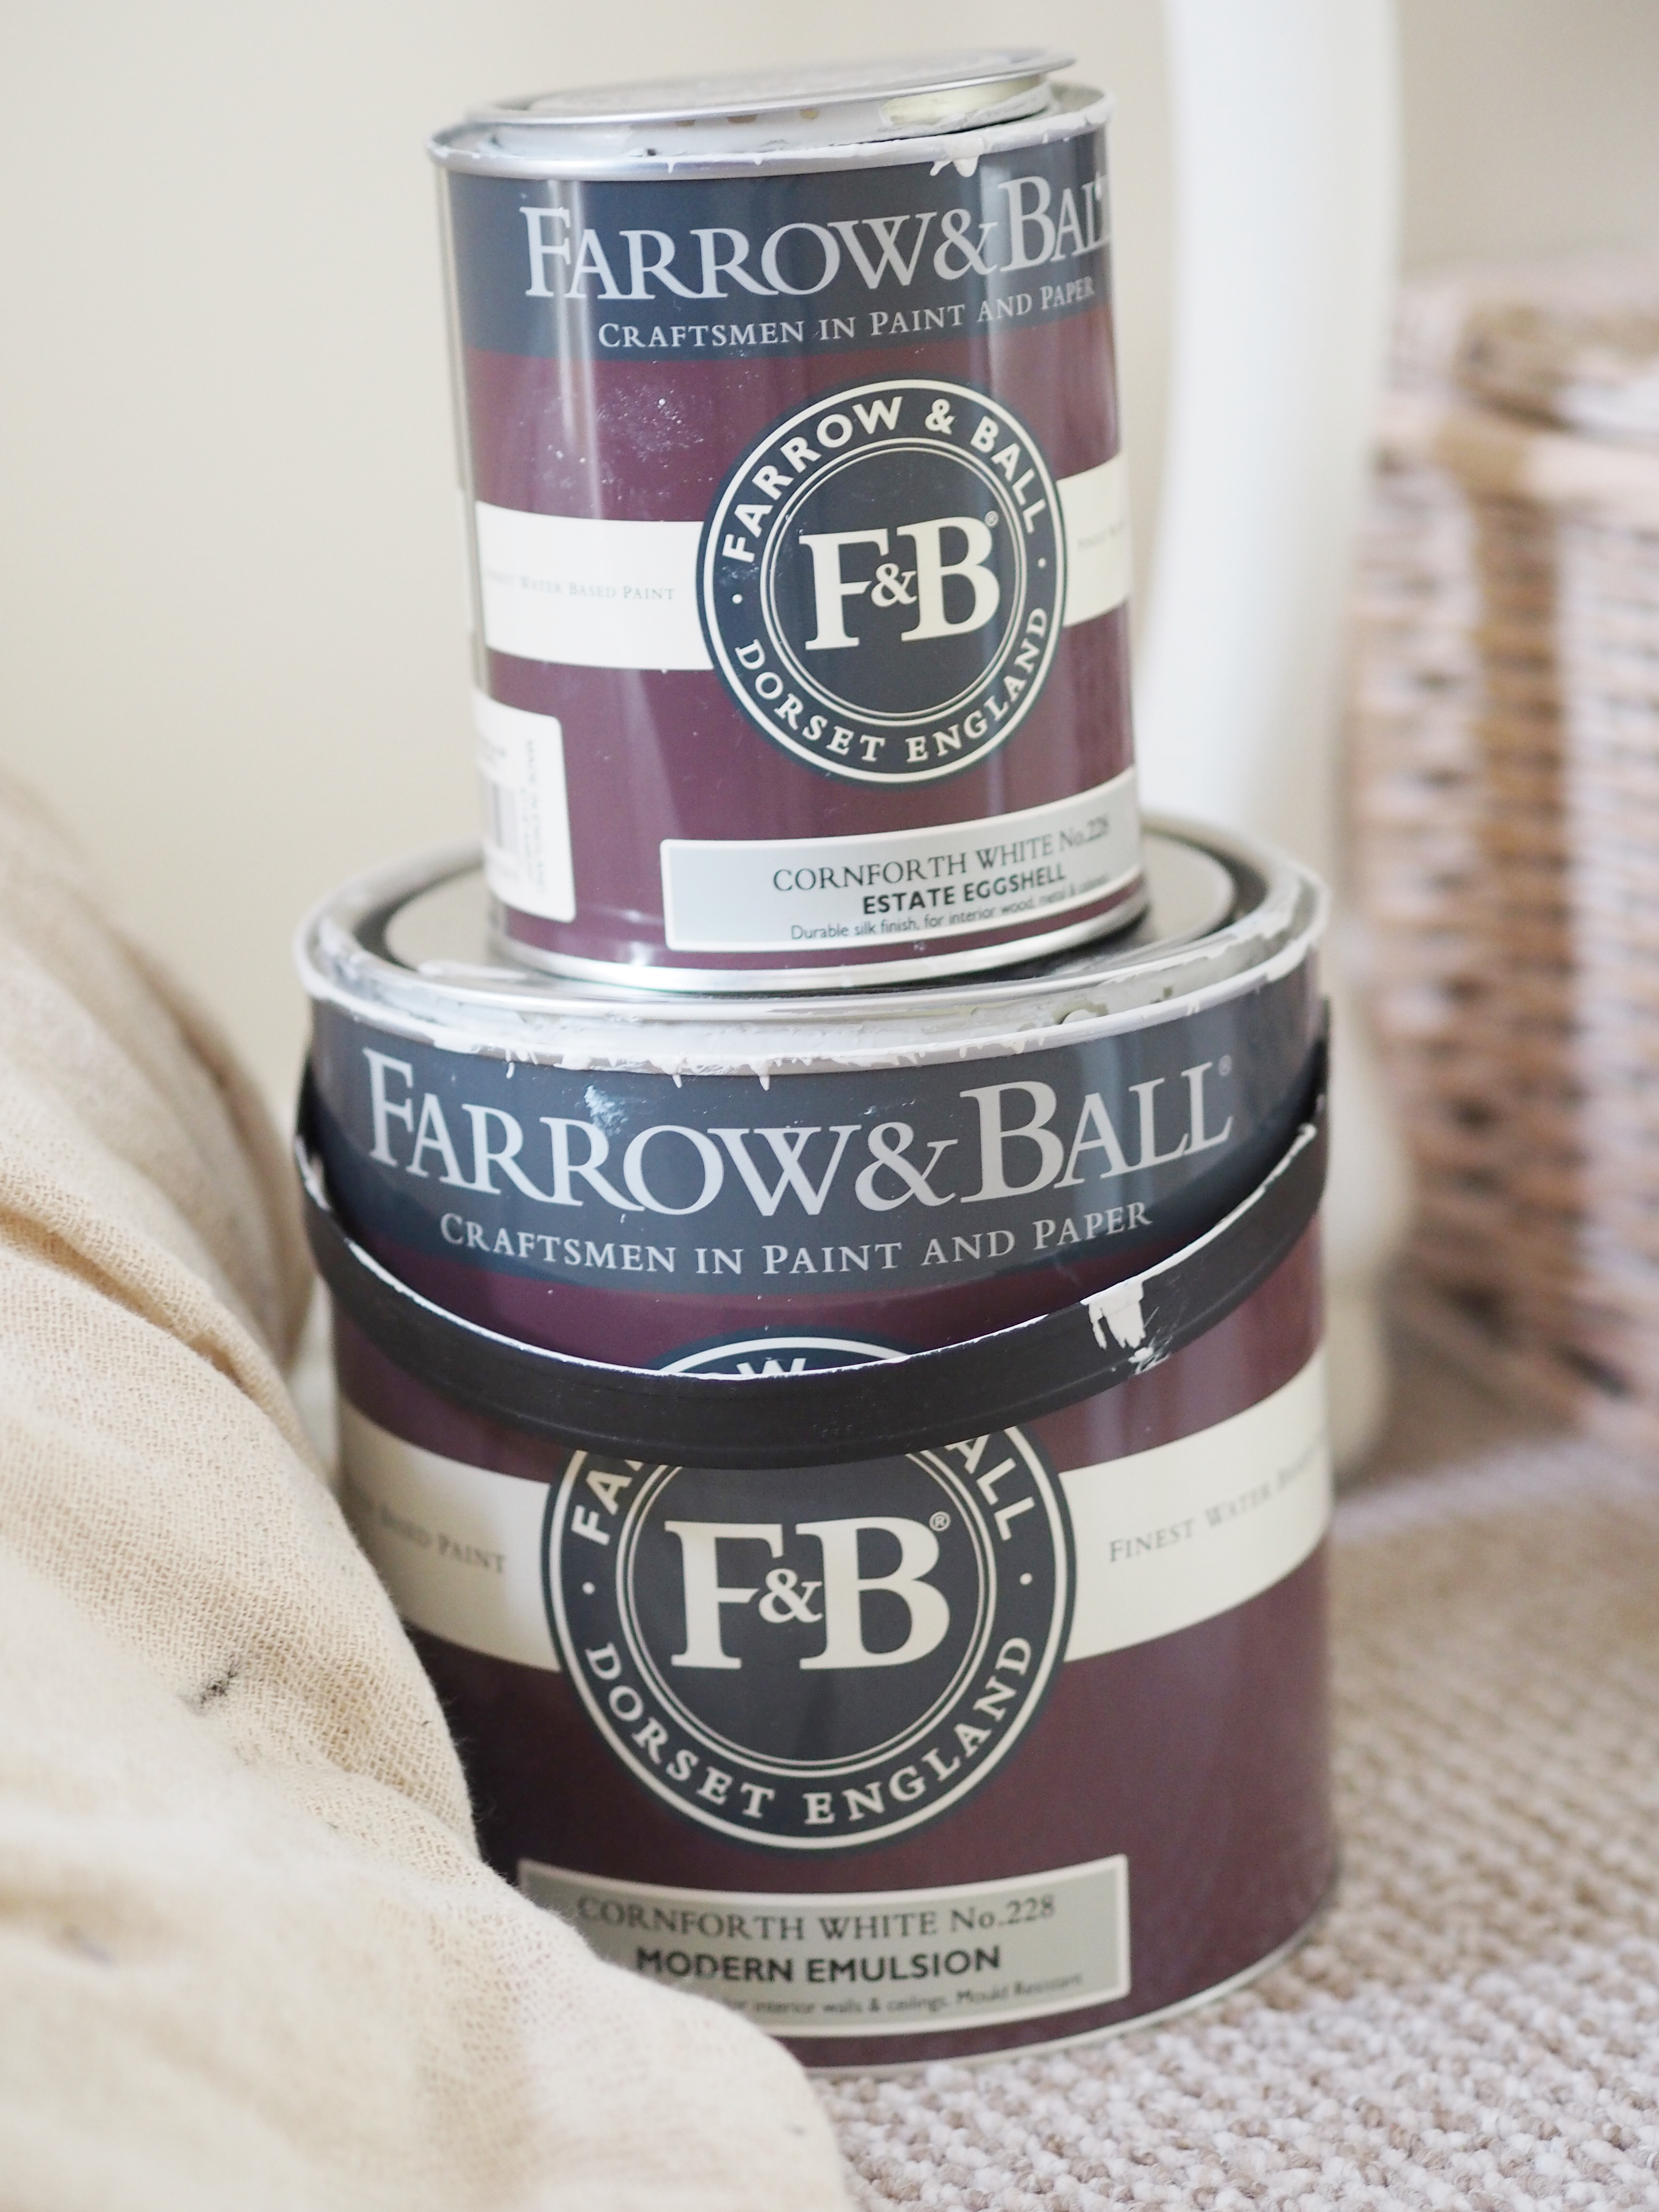
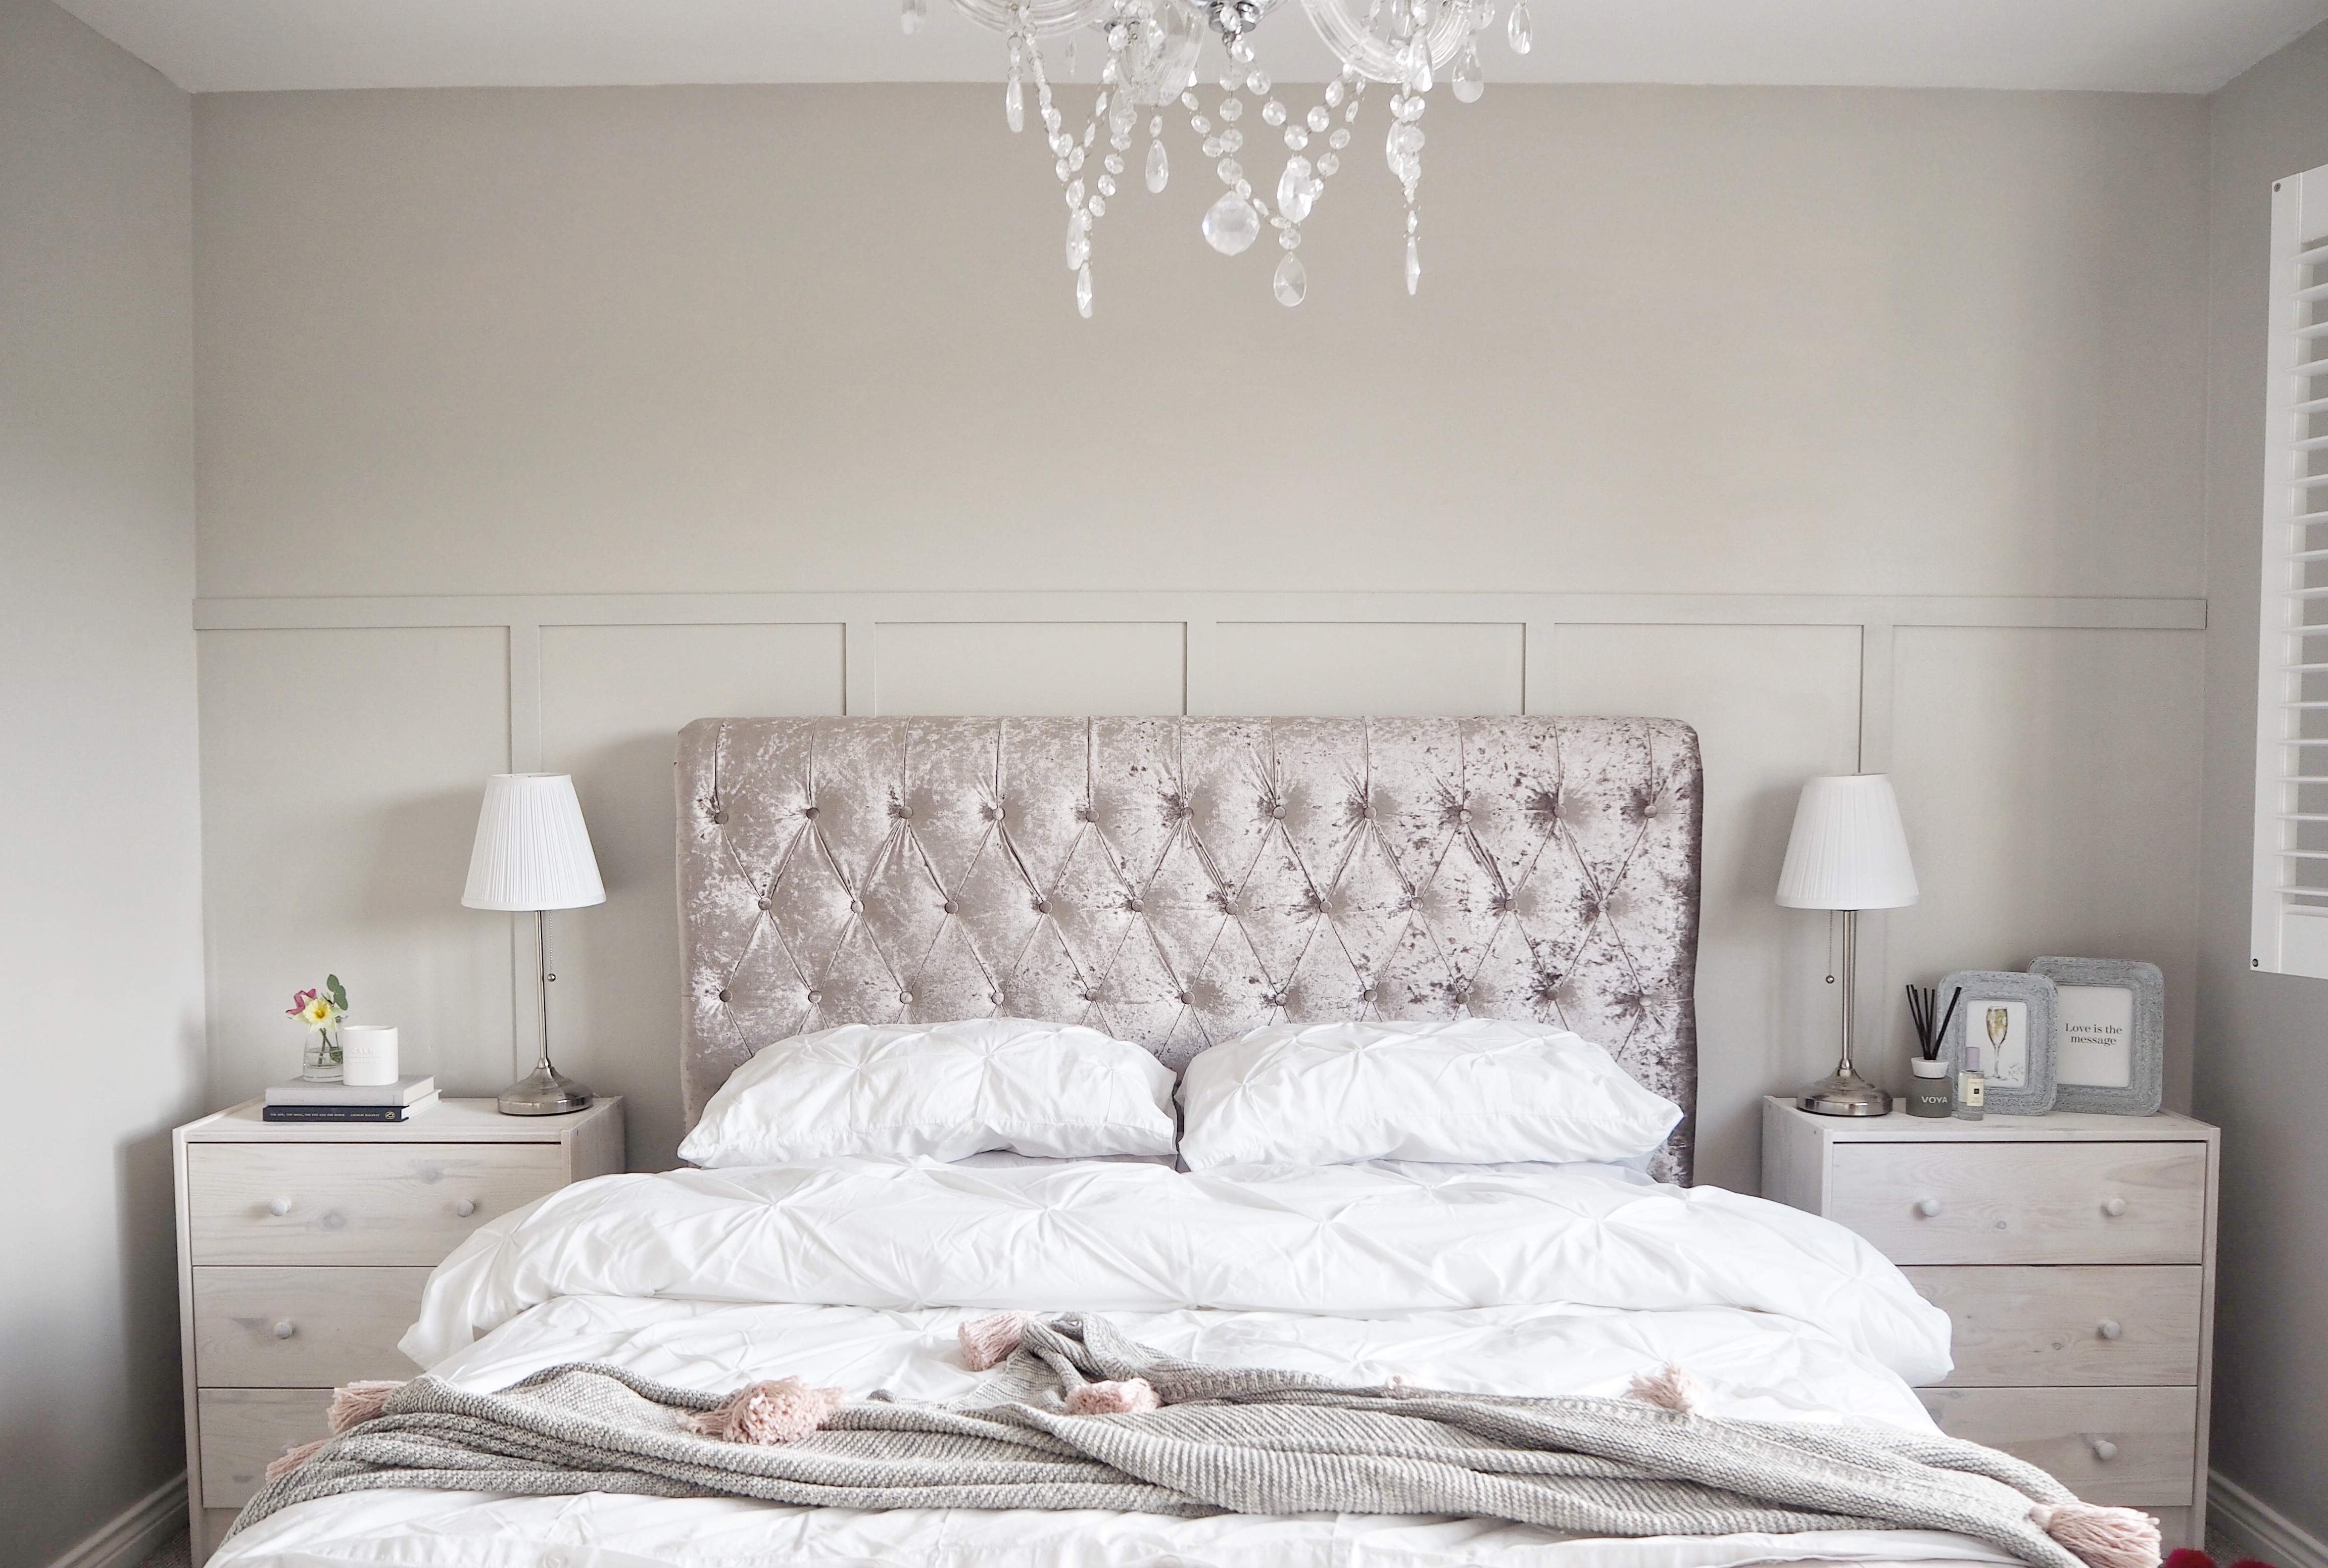
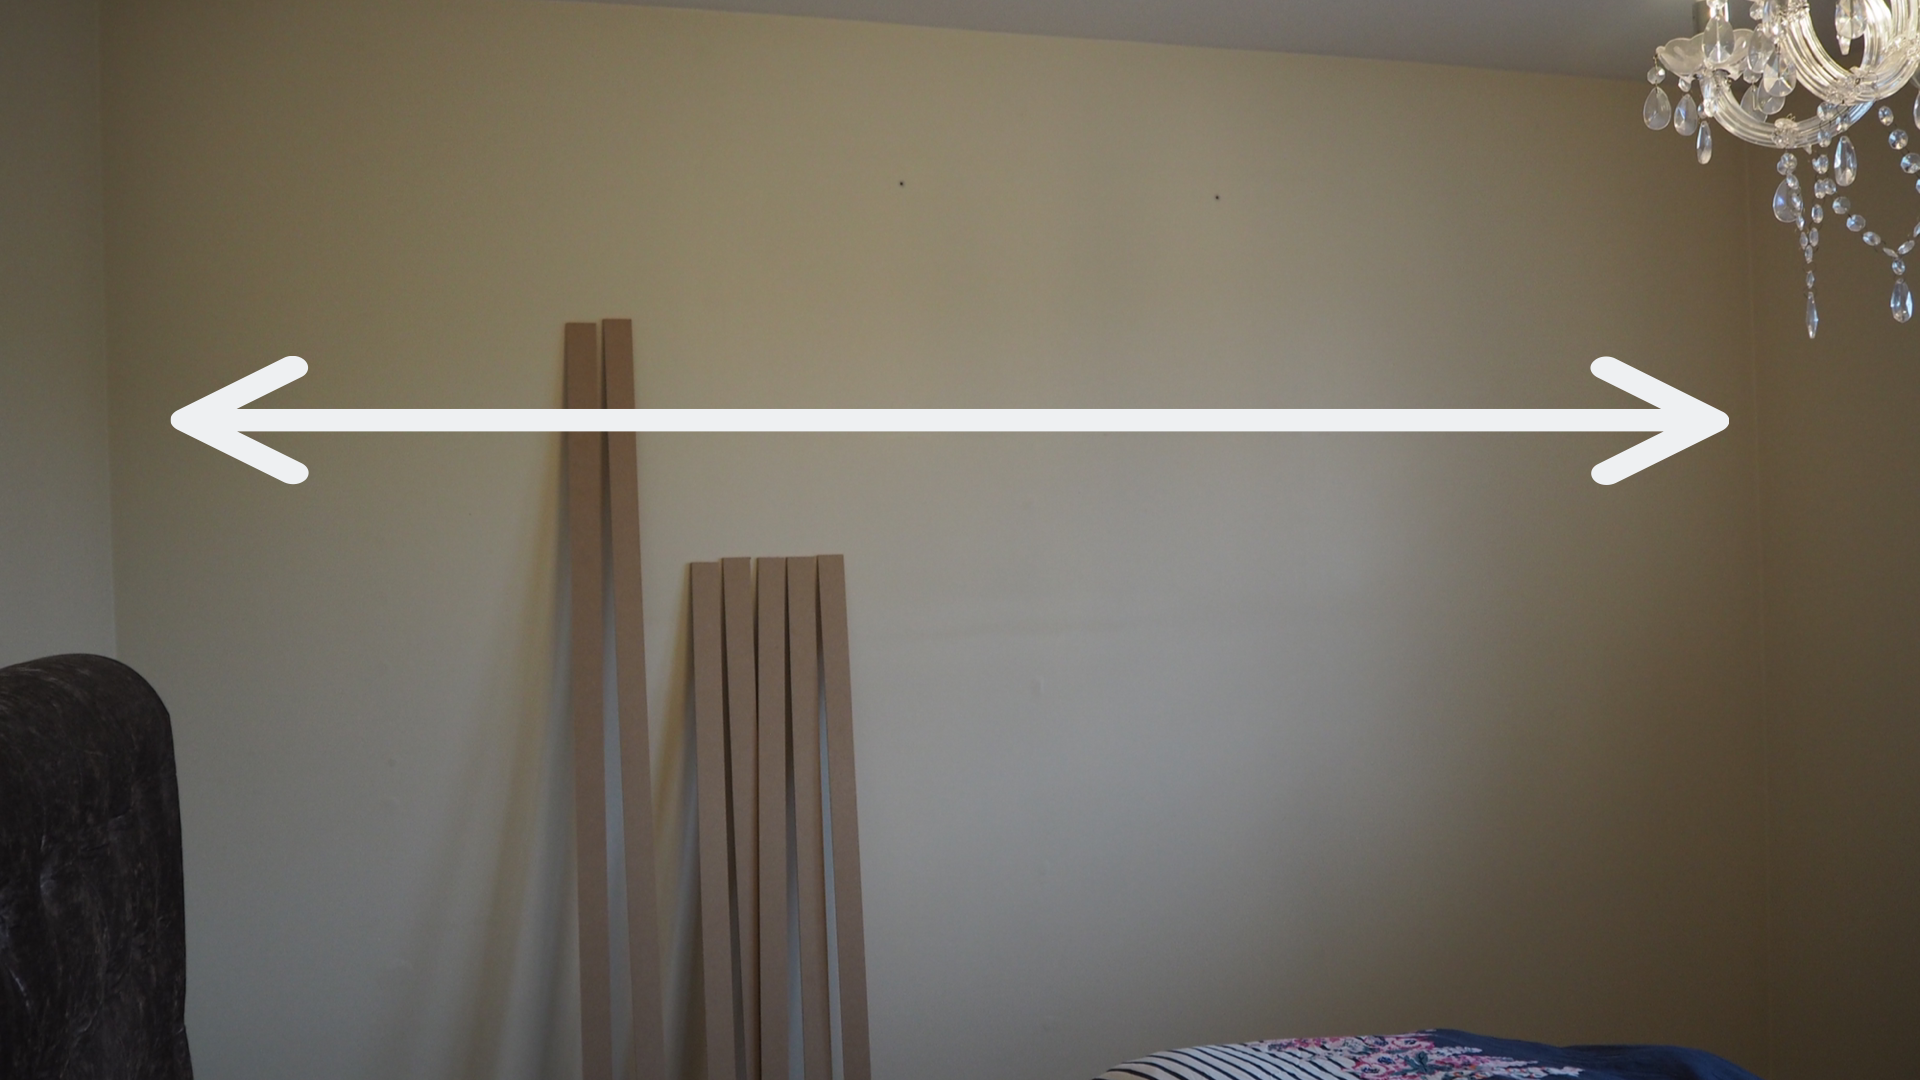
I then marked the wall at the height I wanted the panelling to be (I went for the panelling look which goes roughly 3/4 up the wall).  This was 140cm.

img_0793

I decided I would like 6 panels across my wall so to work out the distance between each panel I divided the length of the wall by 6.  So 338 divided by 6 which equalled 56.

OLYMPUS DIGITAL CAMERA

The wood I chose was 6mm thick MDF which I bought from B&Q.  They have a fab service instore where they cut a large MDF board into any length you would like!

To make my panelling I needed:

1 piece 338cm x 5cm (this was made up from 2 pieces)

5 pieces 140cm x 5cm

The total of this was £10.20! Total bargain don’t you think?!

I marked the wall the whole way along at 56cm intervals on the top of the skirting board and 140cm up the wall; This was to help me place the vertical strips as straight as possible.    I used no more nails to attach the strips of wood onto the wall – this was so simple to do, I didn’t need any help at all! So if I can do it, you can too!

OLYMPUS DIGITAL CAMERA

OLYMPUS DIGITAL CAMERA

Once I had attached all the vertical pieces of wood, I placed the horizontal pieces on top.

OLYMPUS DIGITAL CAMERA
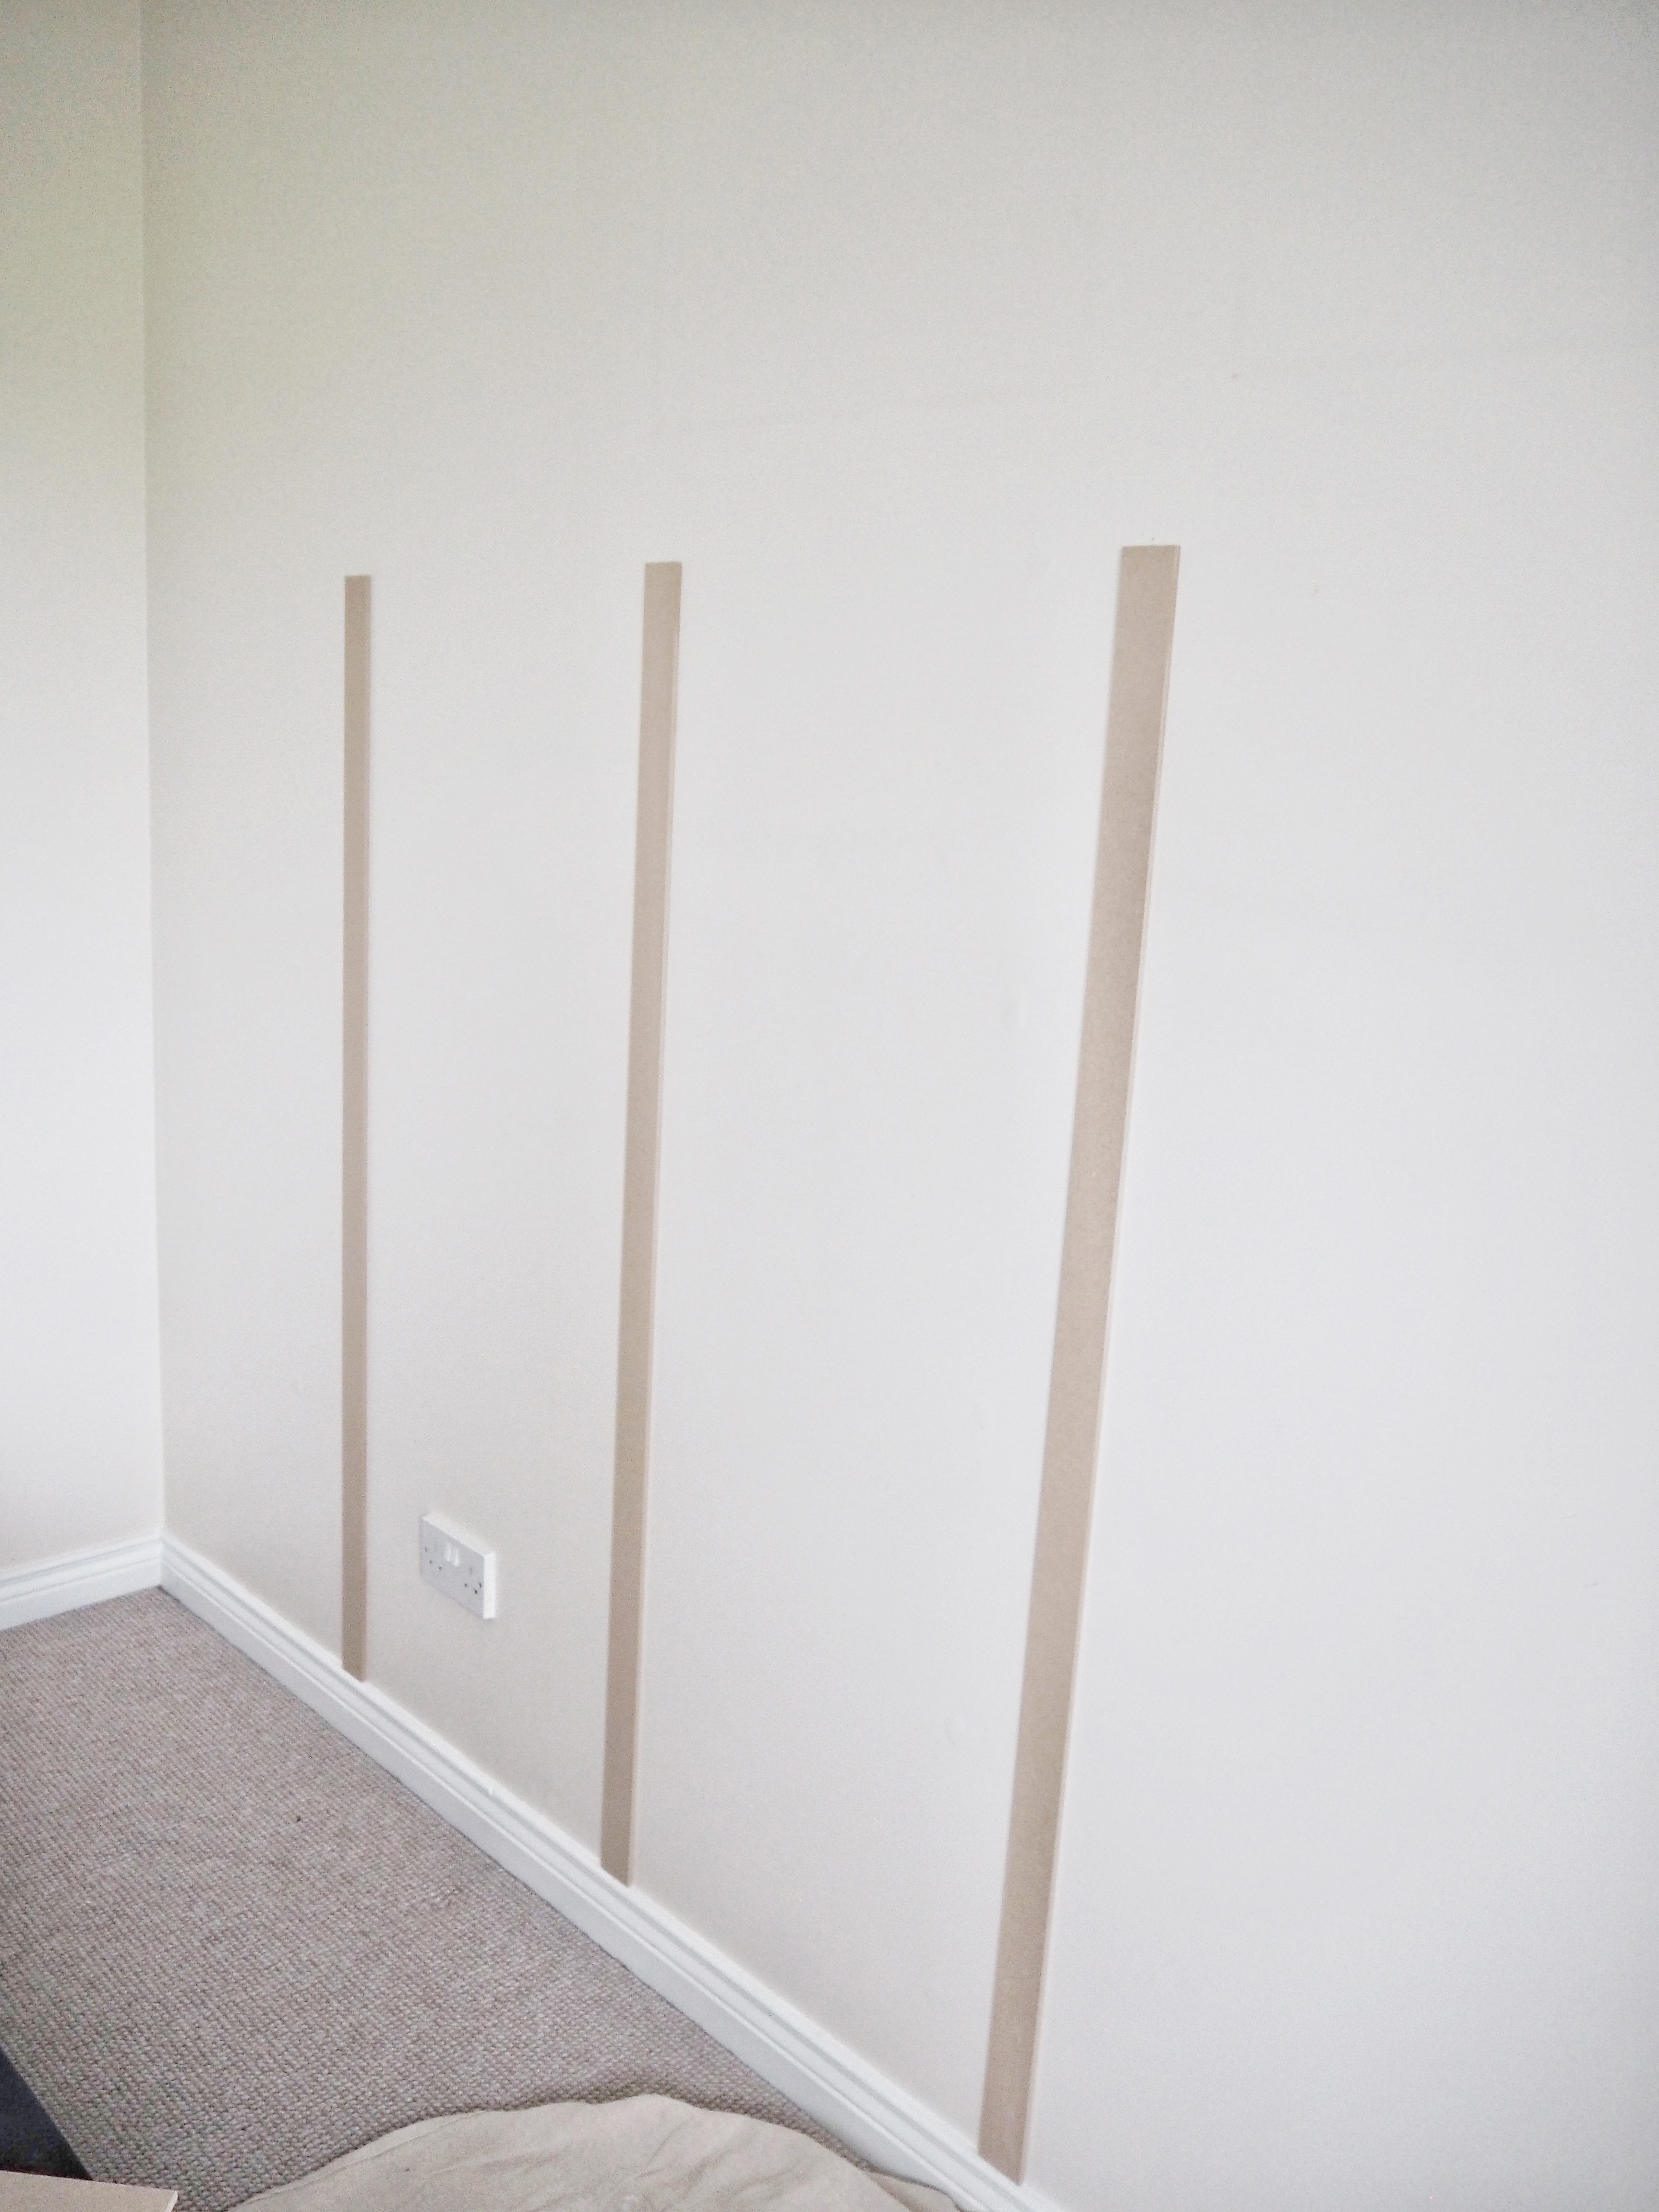
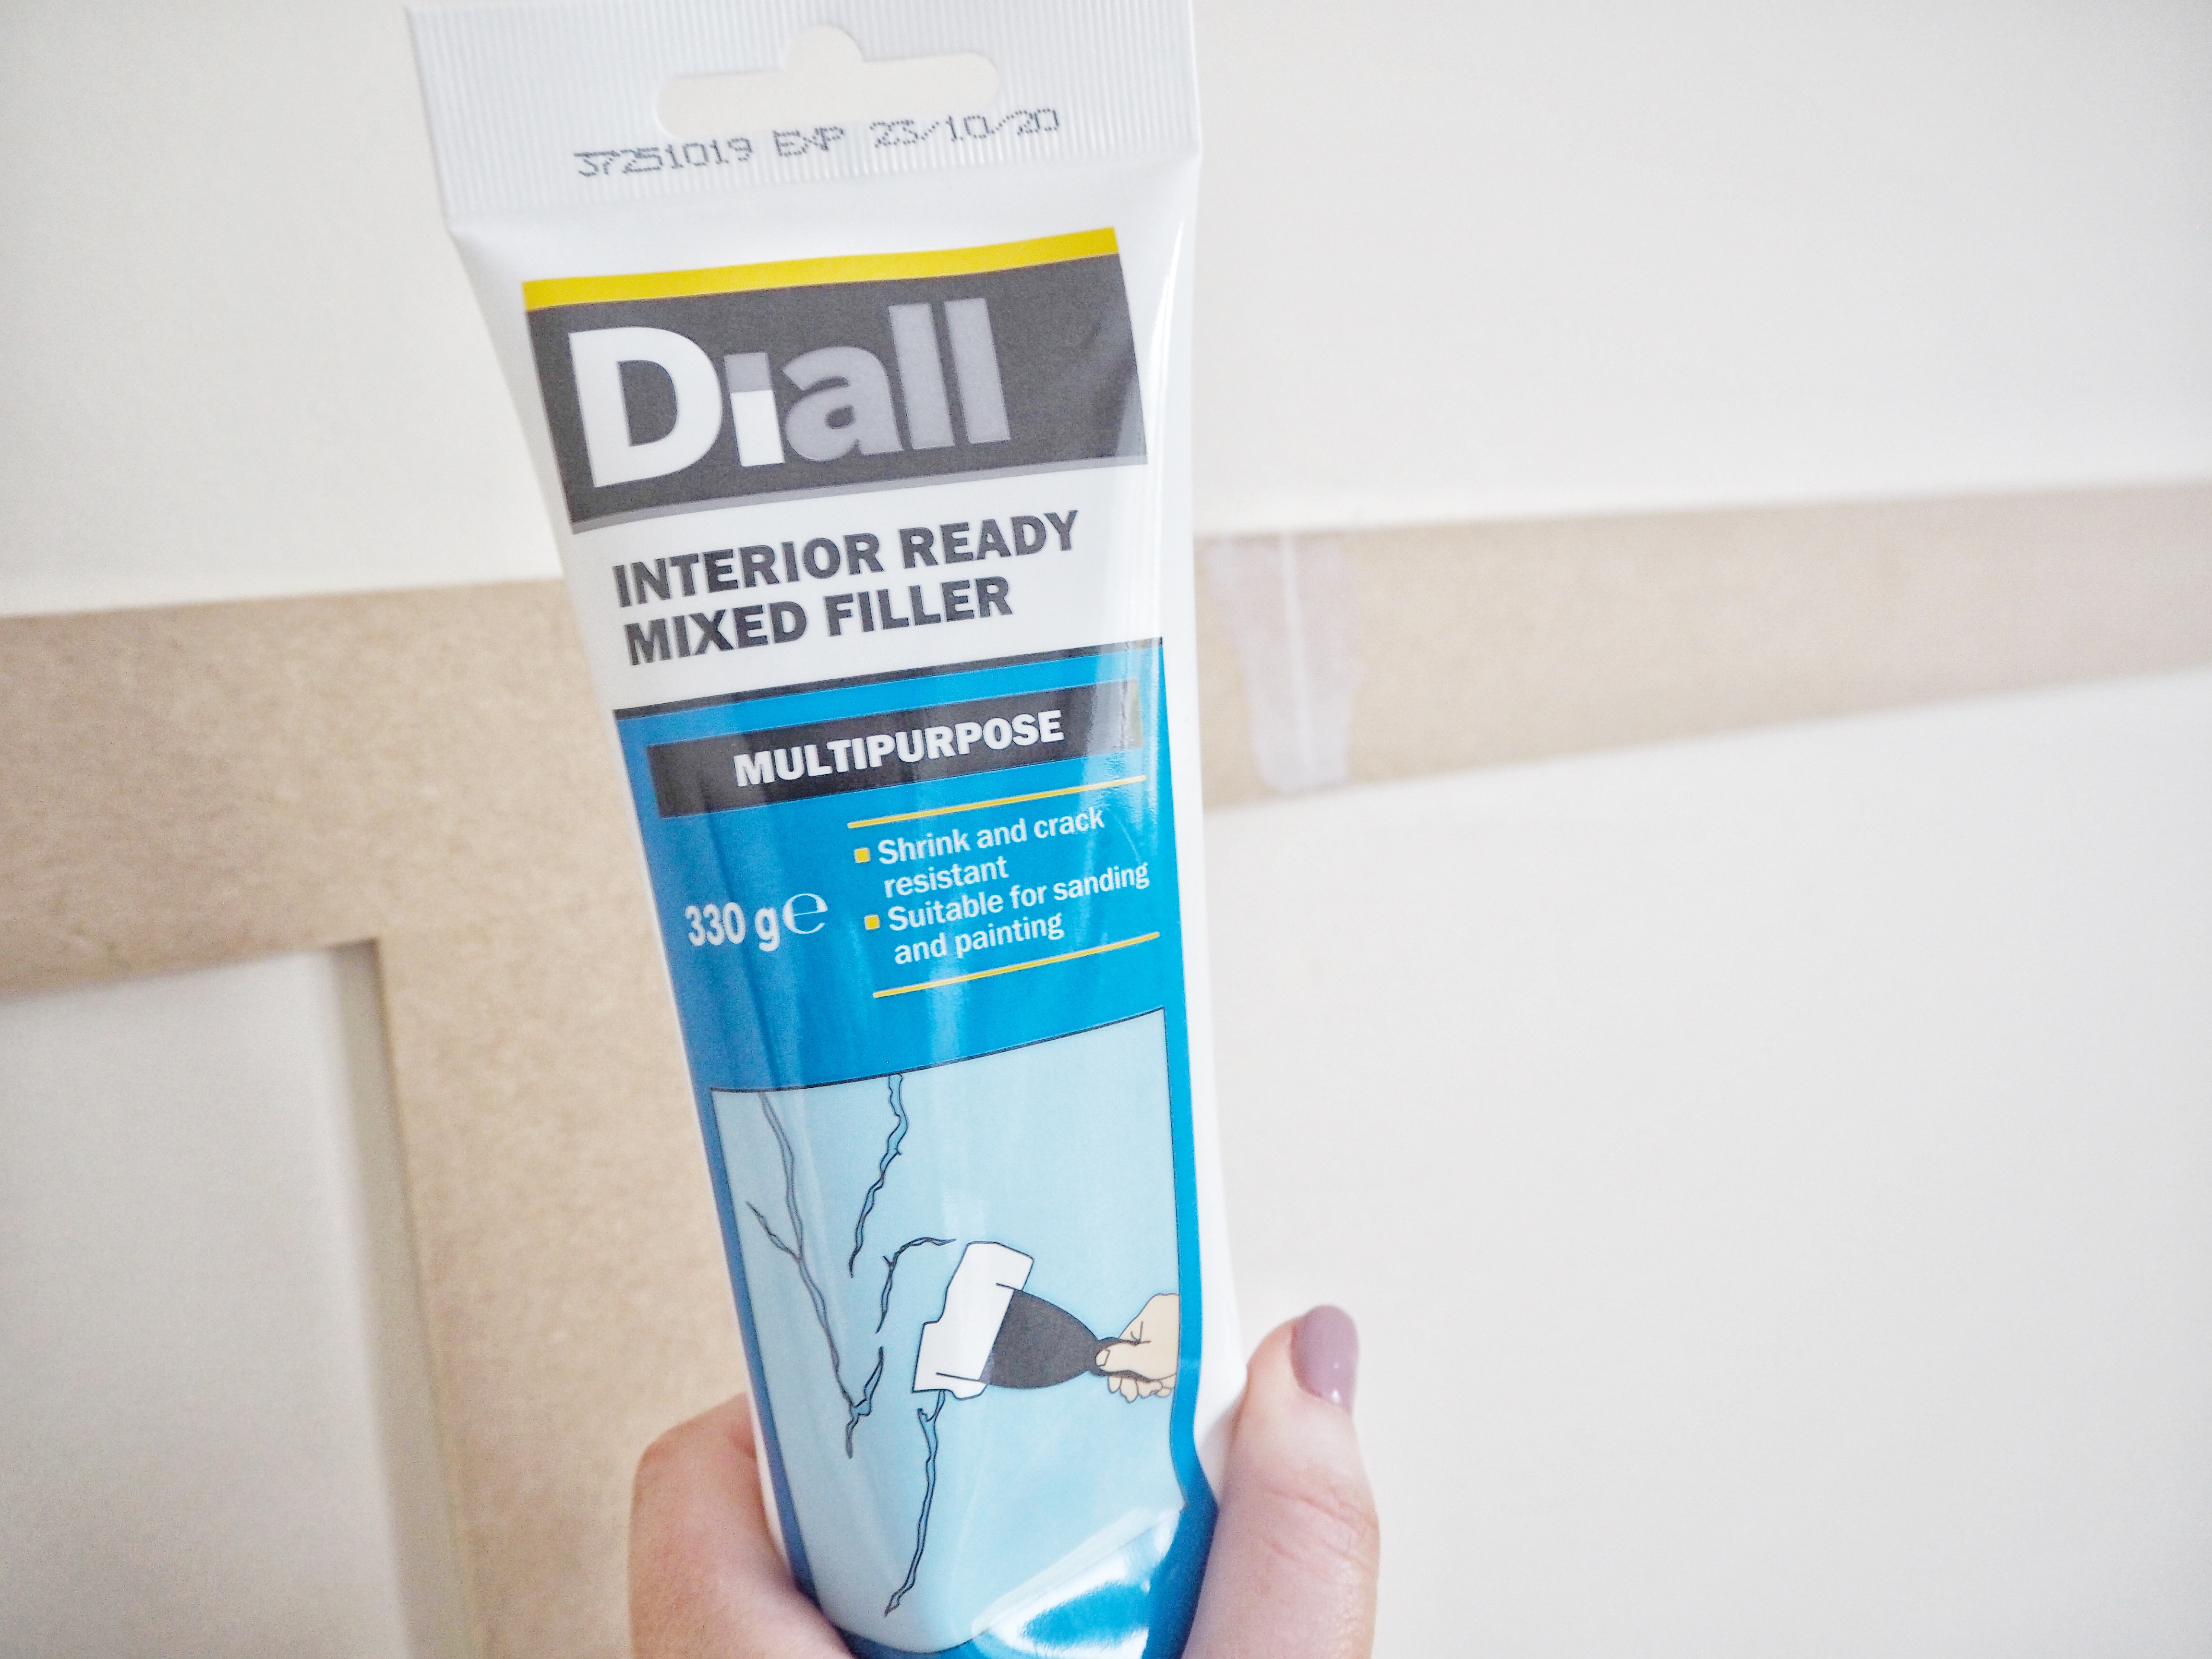
I used some filler to cover the joins.

OLYMPUS DIGITAL CAMERA

OLYMPUS DIGITAL CAMERA

Then painted! As simple as that!

OLYMPUS DIGITAL CAMERA

image

Honestly I cannot tell you how easy this is to do and it completely changes the room!  The cost and effort is so minimal! Id love to hear if you give it a go too!

Hope you enjoyed reading, as much as I enjoyed writing!

Jill